Sunday, December 5, 2010

Backyard and fishpond

Hello all, thought i would let you know what i have been up to. The garden going well, especially the ferns which look fantastic. Since i last posted, i have put laser lite on the pergola roof, set up the guttering and downpipe (PVC) so when its rains the water from the pergola roof is sent to the pond. This is working very well, the pond gets a good flush out with natural rainwater, the pond cannot overflow as i have an outlet which when reached flows excess water to the stormwater pipe. The water tank is all hooked up and plumbed ready for use on the garden and to top up the pond in the warm months ahead. To my surprise the fish have spawned twice recently, a good indication they are pretty happy.I must say it is now the one thing i look forward to most after a day at work, just to sit out on the pergola amongst nature and relax...till next time, stay happy :) P.S. I composed, performed and recorded the music on this clip with my MR8 recording studio :)

Sunday, August 15, 2010

The Final Frontier!

Hello, now that the tank is in and hooked up, time to do something about the front yard. Although only small, i wanted lots of curves in my garden beds. Firstly i needed a good solid border, i decided on treated pine sleepers. Just dig a trench, levelling all the way,back fill, then joining with gang nails ( lucky the ground was nice and soft) :)  Next i wanted something i could shape into curves for the internal garden edging, after a lot of searching, i found what i wanted at the local hardware store. Galanised steel edging with a  ripple effect was perfect for what i had in mind. Installation was easy, dig a trench , level with a rubber mallet, then backfill, no pegs needed!  They came in 6 metre lengths, and about 150 mm high, the top and bottom edges  are folded so nothing sharp to catch on. Joining was easy, overlap by about 100mm, then a few pop rivets to hold together.     Off to the local nursery for some plants!  To top off the beds i wanted woodchips, a red colour was chosen, i have these in the rear garden as well, and they do a great job and look good too. I mulched a depth of roughly 75mm. No weed mats or plastic was placed down before mulching, i just dont like it, and the mulch can break down naturally and do all that organic stuff to the soil! I dont mind weeding anyway :)     Will post more when i get some pics of the completed project..till then...stay happy :)          

Friday, July 30, 2010

Tanks a lot

Hi everyone, well finally got my water tank, a 2030 litre, colour matches my house trim, also an ALKO water pump for around $1000 AU...(all up)   Can't wait to get it hooked up and start storing some H20 for summer. Primary use of this tank will be to keep the fish pond topped up during the hot summer months, and also to give the garden a water too....Preparation of the install site was done a little differently than the norm...firstly i excavated the depth to about 250mm...layed a 100mm thick  layer of crushed rock and compacted well, then carefully levelled the area for the bricks i used to bring it to ground level...i  have a heap of these bricks to use up, so i thought why not?  Time will tell if it was a bad decision or not, but i think it will be ok...will put up further posts when i get to the fun bit...playing with pipes, cheers

Sunday, June 20, 2010

Weather

Hi, been awhile since i have posted anything, but cant do much if the winter weather isnt kind...so, here i was thinking about the weather and decided to get a wireless weather station so i can get an idea what would be in store.I purchased one on ebay for around $115 AU and when it arrived, eagerly set about installing it. A few things i had to consider before installation, some height was needed, it only comes with a 700mm pole so it was either on the pagola roof or another pole in the ground. But i decided to incorporate it into my existing wishing well, the height was ok, plenty of open space for the rain gauge, the only problem was the temperature gauge which is recommended to be shielded or in shade for correct temp reading. Well i had the shade under the roof of the well, so thats where i fitted the temp and air pressure gauge.The information unit which is inside the house, displays all the information needed for any would be weather buff. It really is an amazing little set up...wind speed, wind direction, rainfall, air pressure, inside temp, outside temp, inside and outside humidity, weather tendency feature looks ahead on all gathered info and displays the weather tendency for the next 24 hours or so. The unit is also capable for computer connection to store and compare weather stats collected and also has the time and date! 4 AA batteries ( 2 in outside unit  2 inside) run the wireless side of things....no worries about running wires everywhere, just a few simple connections on the outdoor unit on setup and thats it. The inside unit is touch screen for easy setup, of which most are already set.

Sunday, May 9, 2010

Garden Update

Hi, thought i would show a few more pics of the garden, really taking off now since the weather cooled down a bit. Also added this amazing LED light to the pergola above the pond, really does the job ( will post night pics later) Some pics of the plants blooming in flower  at the moment  and a pic of my favorite fern, love this thing, growing bigger by the day! not to mention the kangaroo paw which is spectacular right now.

Sunday, April 18, 2010

Effects

Hi, today i thought i would talk more music. To compliment my electric guitar, i use a stomp box with built in wah wah pedal by berringer (v-amp).It has 99 pre set effects but is also fully programable to create that unique sound. My amplfiers also in this pic are a 15 watt ibanez practice amp and a 40 watt weconic.. these are more than enough for my sessions at home, both have also built in effects, which i rarely use now i have the v-amp. Next, i have downloaded a mixing program called Mixcraft 5 to my pc, so i can multi-layer tracks using different effects and instruments, should be fun, have to get the right connectors first from guitar to pc.., maybe i will do the backing track to my videos..happy days...

Sunday, April 4, 2010

Guitars


Hello, I thought i would head down a musical track this time and show off my guitars. The first is a Takemine, which i have had for many years, at least 25 or so, the second a more recent addition, a yamaha and finally my favorite, the ashton.They are fantastic guitars to play.

Sunday, March 28, 2010

Days gone by.....


The old farm stables behind my home....hope they always stay.....

Thursday, March 25, 2010

BACKYARD TOUR

A stroll around my little garden....been about 12 months in the making, but i'm sure i will be adding more...lets see....the water tanks, an irrigation system, more plants.....think i will be busy for some time yet!

Gary Moore - The Stumble

Saturday, March 20, 2010

Covered


Hello, well the pergola was a fun project i enjoyed very much. Still not quite done yet. I painted it to match the house and put some temporary shade cloth to keep some of the sun at bay. I plan to put laser lite sheeting on three quarters of the roof and leave the last bit over the pond in shade cloth, this way the garden and pond will still be able to benefit from the rain

Fish feeding time!

A brief look at my fish...they used to be little fella's...but boy have they grown!

Sunday, March 14, 2010

Under cover!

After a bit of a break, it was time to get the pergola up. This is a daunting task on your own and i highly recommend you have a second pair of hands to help. Lynn helped in any way she could (to which i am most grateful). Firstly the 90mm x 90mm treated pine posts were set in concrete and bolted into the deck. Then the fun part (not, lol) how to attach the head board to the house (this is where lynn saved the day) I attached the board through the metal facsia into the truss ends, location was done by gently lifting the roof tiles and marking the truss ends onto the wall. The board is 190mm x 35mm x 6.0 mtrs long, so it wasn't an easy thing to do alone(thanks again lynnie) The self tapping coach screws are 150mm long and were secured with an allen head socket. I could go through all the details of levels and heights but i would be here forever, string line and a good string level were most important.


Pump it up!!!!


Hi, now that the garden is taking shape, it was time to get the pond ready for some fish. I purchased a submersible pump which has a flow rate of about 3500lts an hour. Power was run through the wall and an outside control switch was mounted to the wall. The lead to the pump was encased in some conduit and ran underground and then under the deck and then up to the switch. All the plumbing connections were completed, then it was time for the big test! i purchased 6 goldfish (will be seen in a later post) and kept my fingers crossed, by the way, this pond was filled naturally by rain water, for which i have greater plans to capture and use later on.

Saturday, March 13, 2010

Ummm..Whats that plant called.....


Planting is a bit of a worry for me...what should go where, full sun, shade, height, width,water needs, all these factors are important. Firstly i wanted ferns, i started off with 3 at the fence side of the deck so when you walk out the door they are the first plants seen.

As for the rest, it was just a matter of picking plants lynn and i liked. I knew later on i would build on these, but for now we just wanted something to grow lol

Expanding the greenery

Hello all, now that the pond is semi complete, i set about extending the garden back towards the garage. Off to my favorite hardware store for some garden edging. I wasn't sure what, then i came across some treated pine half logs made up into a mini fence about 1 metre long. In they went....also put in some of those rocks i had been keeping for a little crazy paving at the end of the path...the grass was also sown

Tuesday, March 9, 2010

A Dash Of colour

Once the well was complete, i painted it the same colour scheme as the house, added a bucket to hold a plant, then placed it in it's position. A few stones around the base to hide the pit, plenty of woodchips and of course a plant!

Well, Well, Well.......

Hi again, Once i had the pond in place, i needed a little something to hide a storm water pit in my new garden. I decided a wishing well would look rather good and could also double as a plant feature. For the plans i visited BUILDEAZY and found the perfect little project. This is a great site for finding all sorts of great projects.I used left over decking boards and proceeded to construct!

Monday, March 8, 2010

Something Fishy!!!!


Hi, now that the deck is complete it's time to get the landscaping done.I purchased a fibre glass fish pond on ebay, and set about getting it operational.With the many rocks found naturally in the ground while levelling the soil, i had a starting point. It was a simple matter of digging a hole to suit the pond size and shape. I had a storm water inspection pipe nearby and fitted on overflow hole in the pond and ran a pipe into the stormwater drain concealed under ground. A nice little bamboo border was set in place, some wood chips and a few plants to kick it all off. I also incorporated a water feature into the pond scape.

Sunday, March 7, 2010

All hands on Deck!!

tHi, well its time to get the deck happening. After some careful planning and measurements, the string lines were set as a guide, then a visit to the local hardware store, i decided to use 400mm galvanised stirrups for support, of which around 300mm was embedded in a 300x300x300 concrete footing.


Once i had the feet set, it was back to the hardware store for some timber. I decided i would use treated pine for this project. The main bearers are 100mm x100mm, bolted straight onto the set stirrups(which i did a week later)

Once the mains were in place, i then ran 70mm x 45mm rails across the bearers, fixing them with triple grip brackets to take the 90mm x 22mm decking boards, These decking boards are fluted on one side, i decided (right or wrong) to have the flutes on top, looks much better i think.

After braving the elements(it was quite cold and windy that day) i managed to secure the decking boards using galvanised decking nails (pre drilling before nailing).Once all the top boards were in place, i filled in the sides
As you can see i have built the deck with a cut off corner, this was to allow room for the next stage...The fish pond...thanks for looking, happy days!!!!!!!!

Friday, February 26, 2010

Laying of the bricks
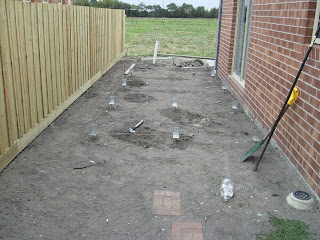
I wanted a path that led from the garage to the back and thanks to the brickies who left a stash of bricks behind, I put them to good use. I wanted my path to be straight and neat, but of course, Lynn wanted the bricks staggered.. so that's what I did, and to my surprise when it was finished, it didn't look to bad.

Surveying the Land

Now comes the fun part.. lol..Checking out the soil , the leveling of the ground and removing all the rocks that lay dormant under ground (they actually came in handy later on as you will see here) The soil was rich in nutrients, I think at one stage, this area where I live, was once a market garden so there was very little or no clay in the soil.
I pegged and used string for all the ground work that would take place in my backyard. It took some time and effort but I was happy with the outcome. As I stood in the dirt, hoping I wouldn't trample any of it inside the new house, I pondered my next move...

And the Story Begins......


When I first bought my house, I had this picture in my head of what I wanted to see in my back yard but I didn't count on having cows for my neighbours. But they're no bother, in fact they add a wonderful country feel to the land and my home. I'm a country boy at heart anyway, however my other half Lynn, was a little sceptical about the whole scene at first ....but slowly changed her mind over time...


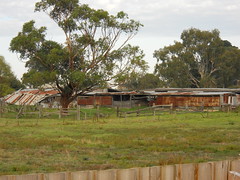
She became quite fond of the cows as a matter of fact, and even gave them names ..Martha and George (I guess the names are after the famous Washington's) What I wanted was a little haven in my back yard, where me and the missus could sit and ponder our thoughts and ideas or just relax and watch life go by..slowly

But someone would have to create this little piece of paradise..And that someone would have to be me.